
To create a new package, select Package from the new menu.
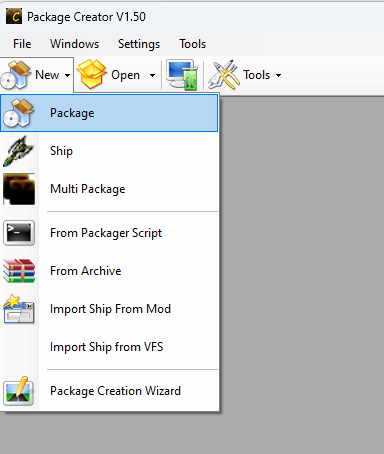
This will create a new package and display it in the main window. You can have multiple packages open at the same time, and will be listed via the package tabs.
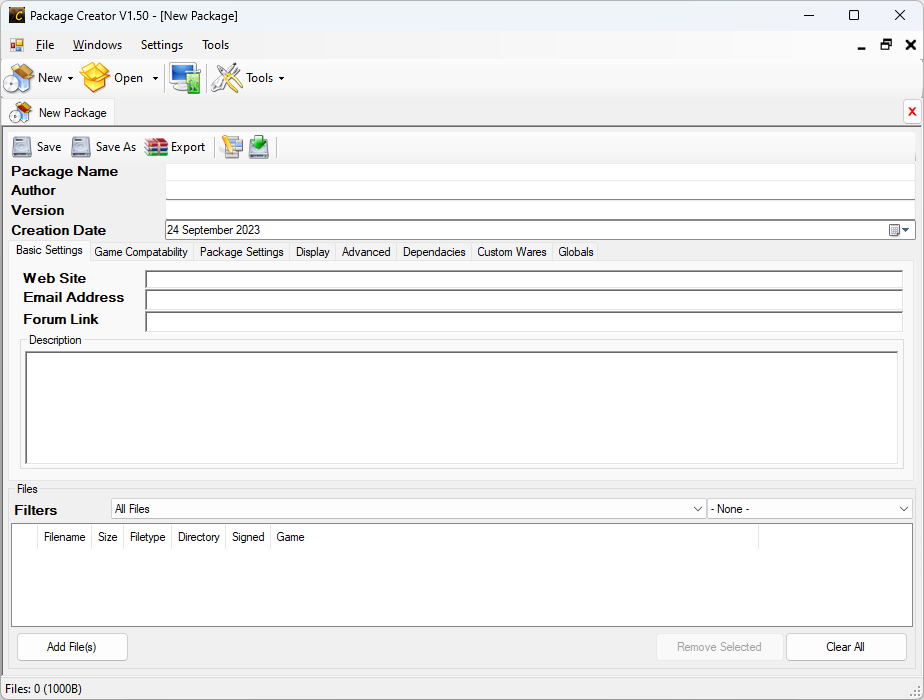
Basic Settings
| Package Name | The package name is the name of the package that is used to identify each separate package | Required |
| Author | This is the packages author (ie You). This is used to identify packages. | Required |
| Version | The version number allows users to see if they have the correct version installed, and used by the auto updated to compare the installed version | Required |
| Creation Date | This is the date the package is created (defaults to the current day). This is mainly for user reference to see how old the package might be |
The Package Name and Author make up the package identifier, this allows new updates to overwrite existing installs, so you should keep both of these the same for each version you release, otherwise the user will end up with multiple packages installed.
Description
The description is a text about the package, the users can view this when installing a package to see what it does. This can be left blank, but is useful for users installing the package.
Files
Here is the list of files contained within the package. There are many different types of files, the type of file determines how and where the file is installed. When adding files, you can chose what file type they are, or let the creator determine it automatically.
To add new files you can use the Add File(s) button to select multiple files to be added. You can also drag and drop files from Explorer into the files list to be added automatically.
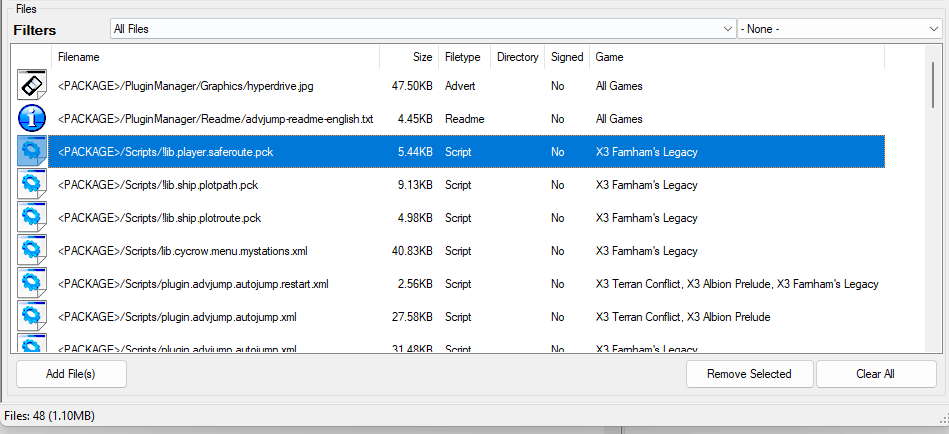
The files display <PACKAGE> indicate they are currently within the package, this is displayed when opening an existing package. Otherwise, the current filename on the hard drive will be displayed instead.
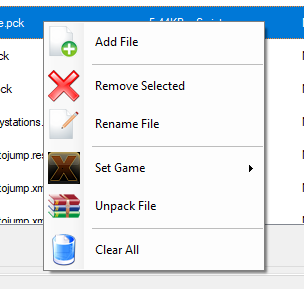
Right click to change the various settings of the file.
| File Type | Directory | Description | Valid Types |
| Script | scripts | An MSCI script file | .pck, .xml |
| Text | t | A Text file | .pck, .xml |
| Readme | PluginManger/Readme | A readme file for the package | .txt, .doc, .pdf |
| Mod | <root> or mods | A mod file, can be a fake patch if named as a number, ie 01.cat, 01.dat (fake patches are automatically renamed when installed). The .dat file is added automatically when you add the cat file | .cat |
| Map | map | A universe map file | .pck, .xml |
| Uninstall | PluginManager/Uninstall | An uninstall script file, these are only active once you uninstall the package, this allows you to create a uninstaller that can be run next time the game is run. If you need to use existing script files, they need to be added as both script and uninstall files otherwise they wont exist when you uninstall | .pck, .xml |
| Sound | s | A sound effects file, these are usually numbered | .wav |
| Extra | An extra file, that can be of any type and installed anywhere. This is for any file that doesn’t fit in any other category. You can specify the directory to be installed in. | ||
| Screen | loadscr | A Load Screen file used to display when the game is loading (adds to the random selection) | .jpg, .png |
| Mission | director | A Mission Director file | .pck, .xml |
| Advert | PluginManager/Graphics | A Graphics file to be displayed when installing | .jpg, .png |
| ShipOther | A Ship file (can be any file thats used by ships). These are usually texture files. Only used in a ship package | ||
| ShipModel | A Ship model file, usually linked from a scene file | .bob, .bod, .pbb, .pbd | |
| ShipScene | A Ship scene file, linked from the TShips entry of the ship | .bod, .pbd | |
| CockpitScene | A Cockpit scene file, similar to ship scene but used as the cockpit | .bod, .pdb |
Game Setting
Files can be set for different games, allowing you to have multiple files of the same name for each separate game if needed. Only files matching the game will be installed when installing the package. This allows you to create a single package file that works for multiple game version, even when the files have been edited for each game.
You can change the game settings via the right click context menu.

You can set it to work for All games, or set it to an individual game. You can also add/remove games from a list allowing the files to work for multiple games. IE you can set a file to work for X3: Terran Conflict and X3: Albion Prelude while adding a different version of the same file for X3: Farnham’s Legacy. This is useful if you edit script files to make use of new functions in later games.
Game Compatibility
The game Compatibility tab allows you to set what games the package is compatible with.
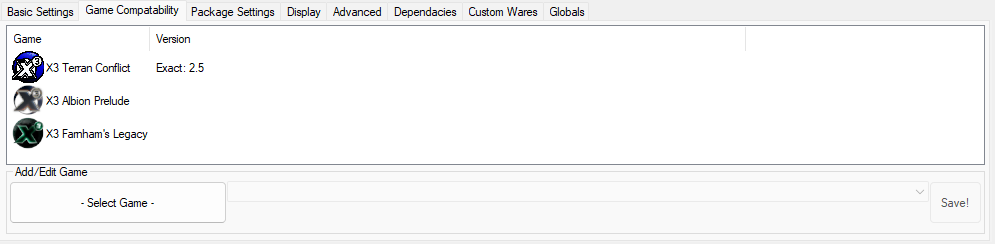
This can also include the version of the game required.
Select the – Select Game – button to add or change the version of the game. For the version, you can select a list of available versions, or input the version manually.
When installing to a game that’s not added, a warning will be shown so the user can see if it will be compatible with their install.
If you leave this list empty it will be considered compatible with all games.
Package Settings
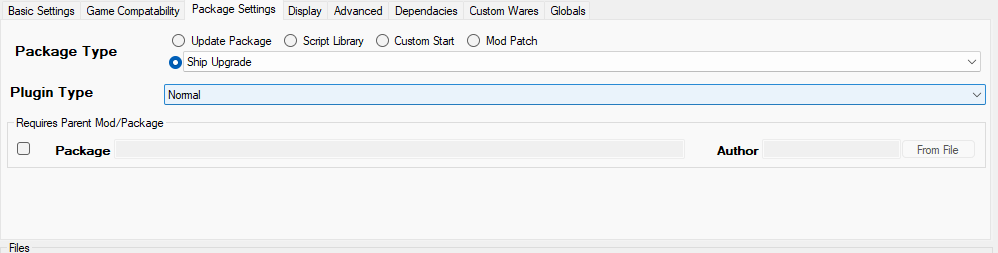
The Package Type is the type of package it is. There are a number of special types, otherwise this is just used for reference for users to give an idea of what the package does. Select the option next to the drop down menu for a generic list of package types, including a custom type you can input manually.
| Update Package | An update package is one that is used to update an existing install. A previous version of the package must be already installed to install the update package, and it will update all the files and settings to the new version. This allows you to create a package files that only contains the changes, rather than all the files, allowing for a smaller package file. |
| Script Library | This is a library package that can be used by other packages, this is mainly displayed separately rom in the Installer, but works the same as any standard package. |
| Custom Start | This is a custom start package that can utilise the custom galaxy selection menu. When installing, this will automatically copy the galaxy and jobs files to a new name so it appears in the Custom game list (Custom Galaxy in X3FL) |
| Mod Patch | Similar to an update package, a mod patch can be used to patch an existing package. Unlike an update package, the mod patch displays as a separate package file that you can disable/uninstall separately from the main package. I.E. You can create a mod patch to adjust lasers by include just a TLasers file inside a mod. This will automatically override the existing package but back up the file so it can be restored later. |
The Parent Mod/Package allows the package to be a child of an existing one. This will always be displayed under the parent mod and requires the parent mod to be installed and enabled. Enter the Package and Author values manually, or use the From File button to select the SPK package to load from, this will fill in the data automatically.
Display
The Display tab allows you to make changes to how the package is displayed to the user.
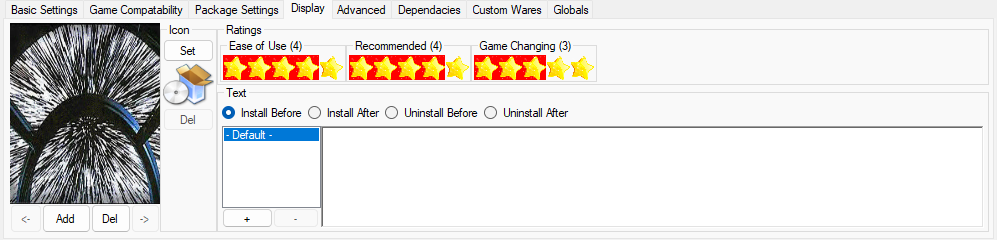
To the Left, you will find the main graphic, this is displayed on the install dialog when installing the package. As well as on the details panel when selecting the package.
The Icon is used to display the icon in the list in the Installer, if not set with use a default icon instead.
The Ratings section allows you to define a number of ratings which are displayed in the installer dialog to give an idea of what the package does.
The Text items allow you to add a number of texts to be displayed at different points during the installation progress. This can include warnings before installing, or additional help what to do. You can add texts in multiple languages, as the installer will read the language of the current game directory and display the text for the correct language if it exists.
Add the different languages in the left panel, the languages are ID codes the game uses for different language texts (these match the international dialling codes)
Install Before shows the text before the package is installed, ie to give some kind of warning or info about the install.
Install After shows the text after the package has been installed, can be used to give additional help about how to use the package in game.
Uninstall Before shows the text before the package is uninstalled, ie to give info to the user of what they might need to do in game before uninstalling the package
Uninstall After shows the text after the package has been uninstalled, so you can gibe additional information about what needs to be done now the package has been uninstalled.
Advanced
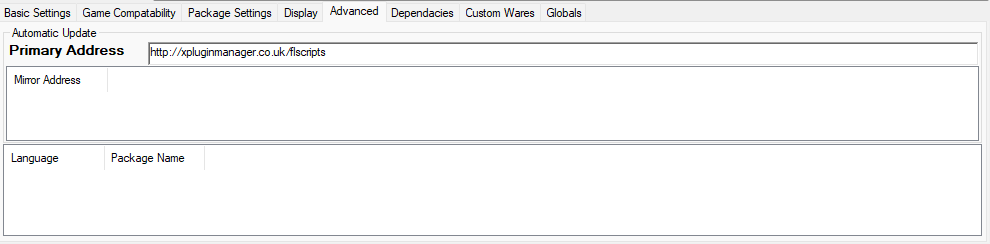
The Primary Address is the server address that your package (and update file) will be found. This address will be used when auto updating a package, you will need to create an update data file and upload it to the server address. This address is also added to the list to find all available packages to add to the Installers Package Browser.
The Mirror Address is additional address which can be used if the Primary Address fails, also allows you to add additional servers to be checked to find packages.
The Package Name options allow you to add a different package name for each language. This is only used for display purposes, so it can display the package name in the users own language. If none set, then just used the default package name. The default package name is still used to detect existing packages.
Dependacies
The dependencies lists allows you to set a list of dependant packages.
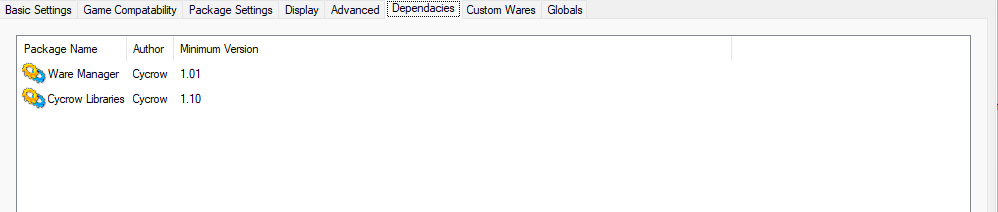
Any package added here will be required to install the package. These will also be automatically installed at the same time if they exist in the Package Browser. The version allows you to make sure the correct version is installed to work with your package.
Dependencies also allow you to control the order of fake patches, any dependencies list will have their fake patches (if they have any) order before.
Custom Wares
Custom wares allow you to add custom wares to the game.
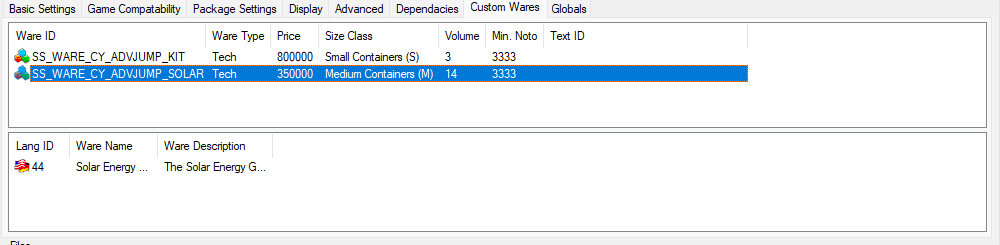
Custom wares are added automatically to the ware files, this allows them to be compatible with existing mods that also edit the wares file. Mainly allowing multiple packages to add their own wares without worrying about compatability.
Unlike using some like EMP to use wares, you have more control over custom wares, controlling the price, size, volume and notoriety required.
Use the right click context menu to add and edit the custom wares. The Ware Type determines which ware file the entries will be added into.
The bottom section allows you to add the texts for each language for the ware. You can also use an existing text ID instead. When using the custom text entries, these are added automatically to the Plugin Managers text file using a generated text id.
Globals
The globals tab allows to you add global settings that can override the existing globals file
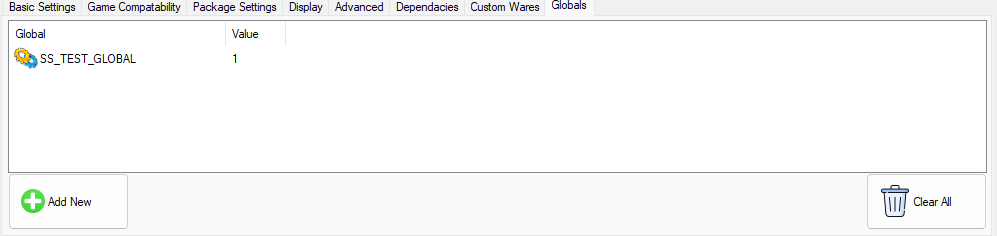
This allows you to add individual globals entries without effecting compatibility with other mods that may edit the globals file. This allows multiple packages to edit separate globals entries without having to add the globals file itself.
This also helps if the game or mod is updated with new global changes, and the package will remain compatible without changes.
Control Buttons
At the top you will find some control buttons for the package.

Save will save the current package, overwriting the existing file
Save As will save the current package to a separate file.
Export will export the package to a zip file which can be installed manually (the zip file contains the package data file which allows it to work fully if installed via the Plugin Manager)
Generate Packager Script will generate a packager script file from the current package. Packager scripts allow for the automatic creation of package files
Generate Update File will create a package update file which can be used for auto updating the package (ScriptName_Author.dat) to be uploaded to server.